


I can’t wait to share this post for you - Icing Cakes For Beginners! I am here to demystify achieving smooth sides and razor sharp edges on your cakes.
For SO long, it baffled me how bakers achieved perfectly smooth edges and sides. It doesn’t have to take you as long to figure it out!! That is why I created this post - icing cakes for beginners. Read on for a step by step guide to getting a smooth sides and a sharp edges on your buttercream cake.
There are a number of key factors that are imperative to achieving a smooth side to your cake. Most importantly --
1. Buttercream Consistency.
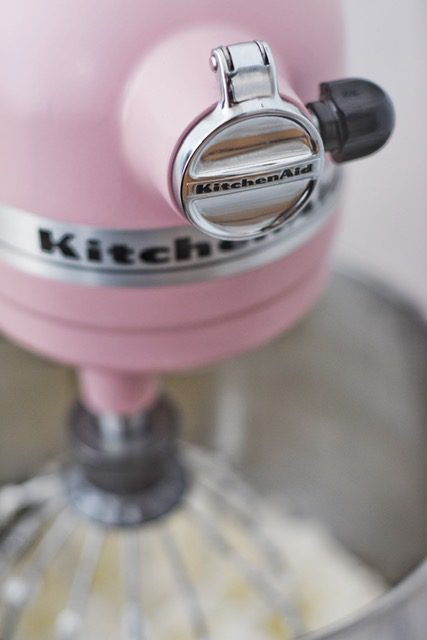
95% of the time I use Swiss Meringue Buttercream. This buttercream spreads so smoothly and reduces the amount of work you need to do to make your cake sides perfect. After whipping all of that glorious air into your buttercream, it’s important get the small and visible air bubbles out. To do this, I like to set my electric stand mixer with the paddle attachment on to the lowest speed for 8-10 minutes! This pushes the buttercream into the sides of the bowl bursting any unwanted air bubbles. After this, I take my spatula and hit the buttercream on the sides of the bowl in a back and forth motion just in case any air bubbles still remain. This creates a beautiful silky smooth buttercream that will spread on like a dream!
Buttercream that is too firm. If your buttercream is cold or on the firmer side, it will not spread easily, cause crumbs to drag up and be more difficult to smooth to perfection. The buttercream also turns more of a yellow colour.
Buttercream that is too soft. If your buttercream is extremely soft, it won’t stand the weight of the cake and the structure may be compromised and your buttercream will not stick to the cake! If it is too soft, place the buttercream into the refrigerator for about 25 minutes and then re whip it.
If you've been struggling with achieving the perfect consistency buttercream go give my go to Vanilla Swiss meringue buttercream recipe a try. I'm certain you will fall in love.
2. Applying a crumb coat
I cannot stress this enough! Applying a crumb coat to your cake is essential for creating a smooth canvas to frost your cake. A crumb coat is a thin layer of buttercream frosting applied to the outside of your stacked cake. A crumb coat serves to lock in those crumbs and prevent them from getting into your outer layer frosting! This step is crucial and often missed by beginner bakers – this will help you achieve the perfectly clean buttercream you want!!
Once your cake is crumb coated, make sure to chill it in the fridge for 25 minutes. Chilling serves as one extra factor to prevent those crumb from getting into your outer layer of frosting.
3. Use an offset Spatula
An offset spatula helps to apply small amounts of buttercream frosting to your cake. You'll want to apply an even layer of buttercream to your entire cake before using your bench scraper to smooth the cake. Make sure to use small back and forth wrist motions to spread the buttercream and not sweeping motions. Keep your offset spatula relatively stationary and rotate your turn table to frost the cake.

4. Use a Bench Scraper (smoother)
When I began making cakes I had absolutely no idea this was even a tool. I just thought bakers magically applied the buttercream to cakes perfectly smooth – face in palm. You will NOT be able to achieve a perfectly smooth cake side unless you have a bench scraper. My favorite cake combs to use are Ester Cake Combs. I like that they are tall, light weight, and metal. The last point is especially important when smoothing your cake. I frequently run my cake comb under hot water to clean it off, but also to assist with the smoothing process.
When using my bench scraper I hold it at a 45 degree angle to the cake. Make sure not to hold it at a 90 degree angle or you will scrape too much buttercream off and end up with holes in your cake. Ensure that your smoother is level with your surface and very gently smooth your cake by spinning the cake turn table in one full circle. Do not move the bench scraper around – it should remain stationary.

5. Use a cake turn table
Using a turn table makes it exceptionally easy to complete one full rotation smoothing your cake with your cake scraper against the cake. By doing this, we avoid multiple scrape marks around the cake. I started with a low cost plastic turn table but highly recommend this one that I’ve upgraded to. If you plan on making more than 10 cakes a year, I urge you to buy this one!
I hope this post on icing cakes for beginners and it helps you create ultra smooth cakes! If you try any of these tricks out, make sure to comment below and let me know how awesome they were. Make sure you take a photo and tag BAKED by Blair on social media and use the #bakedbyblair so I can see what you're baking up.
If you’d like to return to the 3rd step of my guide: how to decorate a birthday cake for beginners, you can return to my post on essential baking tools here.

Leave a Reply